Monday, August 17, 2015

How to get a physical image of a Lumia 800 (Windows Phone v7.8)

I recently had to analyze a Nokia Lumia 800 (RM-801) which is a smartphone running Windows Phone v7.8.

Unfortunately for me, at the time of this writing Cellebrite UFED 4PC is unable to extract a physical image from this phone model.

After some research on the internet, I found out that there's a flasher box which is able to root specifically two Lumia phones: Lumia 800 and Lumia 800C. After rooting, according to some posts I read in the forum GSM-Forum, the phone should be recognized as a mass storage device (or something like that).

If you're not familiar with flasher boxes, I recommend you to read the article Flasher Boxes: Back to Basics in Mobile Phone Forensics. A few years ago I attended these two excellent courses in order to learn how to use these tools:


After the research phase, I needed to do some lab testing. So I bought:
Cyclone Key Reloaded

I arranged a physical machine with Microsoft Windows XP SP3. In my experience, some flasher boxes are not that stable on newer operating systems. Cyclone Key Reloaded is one of them.

Rooting the device

After installing its drivers and software, plug in the flasher box to your computer.
From the main interface of the program Cyclone Box Module Loader: click on the Nokia Tool button | go to the Connection tab | set the connection to USB.


Connect the phone to your computer (not to your flasher box) by using a standard micro USB 2.0 cable. Wait for Windows to recognize the phone.

After that:

  • go to the tabs: WP7,WP8 (Qualcomm) | Simlocks
  • choose RM-801 Lumia 800
  • click on the ROOT ! button

This is an example log that will appear during the rooting on the right side of the program window.

[Nokia USB Connectivity]: WinUSB Port opened OK!
Product code read OK
Lumia No TP Root Procedure Started...

If phone is alive, It will be automatically swithced to OSBL mode.
If software can't switch to OSBL mode, or phone is generally DEAD do folllowing:

1. Turn OFF device, wait 15 seconds afterwards
2. Eject USB cable, wait 10 seconds
3. Press and hold Volume-UP button
4. Insert USB Cable. OSBL should be booted.

Booting CMT...
[Nokia USB Connectivity]: WinUSB Port opened OK!
Switching to RAW Mode...
[Nokia USB Connectivity]: WinUSB Port opened OK!
[Nokia USB Connectivity]: WinUSB Port opened OK!
OSBL Details
Protocol: v1.1
Version: v257.6
Build: 12
OSBL Bootloader Ready
USB&UART Tracing set
RSA Signature Calculated for QCB Boot, Writing...
OSBL Certificate Details
Magic:      WP70
Version:        0
Auth Level: Care
Data Encryption:    0
Image Index:    0
Asic Index: 0
Type:       Image Write
Hashtable Parsed OK
Certificate Accepted
[ASIC 0, Storage 4,1] Writing 850.552kB @ 0x000000000007D200
Write taken 0.400s (Average speed: 17419,04kBits/s)
Restoring Modem from BACKUP_RAMFS_IMAGE...
Restore OK
Restarting MCU...
Rooting Finished!

I unplugged the phone and turned it back on. I didn't notice any data loss. All my data was still there.

Imaging the device

Go to your forensic acquisition computer.
  • turn off the phone
  • connect the USB cable to the computer, but not yet to the phone
  • while holding the Volume Up button, connect the USB cable to the phone 
  • release the Volume Up button as soon as you see Windows asking you to format the phone
  • Please, don't format the device!

Now, you're ready to physically image your Nokia Lumia 800 phone.


I'll write about parsing in the next blog post.

Saturday, August 15, 2015

Geotag2kml: python script to create a KML file from geotagged pictures

Sometimes it's not the photo itself that matters, but where the photo was taken.

I needed a tool to parse thousands of geotagged pictures and show them on Google Earth. I wrote a Python script based in part on what was posted years ago in the ExifTool Forum.

My script was written to:
  • parse recursively geotagged pictures
  • create a KML file to show geotagged pictures on Google Earth
  • group and sort GPS data by date
  • show visually for each date where the first geotagged picture was taken. Each first GPS point is indicated by the icon of a small man
  • connect the GPS points of each date with a colored line
  • get the preview of a picture when clicking on a placemark
  • list make and model information of each digital camera used to take and geotag the analyzed photos
  • speed up my analysis ;)

Prerequisites
  • Python v2.7
  • Exiftool (rename the executable to "exiftool.exe" and put it in the same folder of the script)
  • Google Earth

Usage

Run the script and type the absolute path of the directory containing your pictures. The script will create and save in this path a file named "GoogleEarth.kml".

Download

geotag2kml v0.1

Here are a couple of screenshots.


Thursday, August 13, 2015

USB Write-Blocking with the registry: Beware of UASP on Windows 8/8.1 - Workaround

I read once more the description of USB Attached SCSI on Wikipedia and I noticed these two lines:

Microsoft added native support for UAS to Windows 8. Drives supporting UAS load Uaspstor.sys instead of the older Usbstor.sys. Windows 8 supports UAS by default over USB 2.0 as well.

That explains why my UASP device works in "UASP" mode even if I plug it in on a USB 2.0 port.

I then thought: what if I replace uaspstor.sys with usbstor.sys?

And you know what? It worked!


These are the steps for the workaround:

  • boot into safe mode: within Windows, hold the SHIFT key and click Restart
  • click on the Troubleshoot button
  • select  Advanced Options
  • choose Command Prompt
  • login into your admin account
  • from command prompt, type C: and press Enter
  • type cd windows\system32\drivers and press Enter
  • type ren uaspstor.sys uaspstor.sys.old and press Enter to rename the file uaspstor.sys into uaspstor.sys.old (or whatever you like)
  • type copy usbstor.sys uaspstor.sys and press Enter to have an additional copy of usbstor.sys renamed into uaspstor.sys
  • close your command prompt by clicking on the "X" in the upper right corner
  • click on the Continue button to exit and reboot into Windows 8/8.1

Set "WriteProtect" to "1" in the registry, plug in your UASP device and finally enjoy it in read-only mode!

Since I applied the workaround, I haven't had any BSOD or software issue. So far it appears to be a stable workaround.

Your feedback is appreciated, thanks.

Sunday, August 9, 2015

USB Write-Blocking with the registry: Beware of UASP on Windows 8/8.1

Introduction

On Microsoft Windows operating systems it's possible to use the Windows registry to disable write access on USB ports.

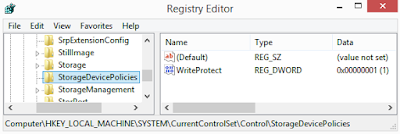
Figure 1: HKLM\SYSTEM\CurrentControlSet\Control\StorageDevicePolicies

That has been for a long time a convenient and safe way to make USB ports read only. Until UASP came out.

"USB Attached SCSI Protocol" (UASP) is designed to improve USB 3.0 transfer speeds. Microsoft Windows 8 has native support for UASP as written on the page "Windows 8: What's new for USB":
Windows 8 includes a new USB storage driver that implements the USB Attached SCSI Protocol (UASP). The new driver uses static streams for bulk endpoints, as per the official USB 3.0 specification.
Analysis

For this test I decided to use:
  • HP EliteBook 8470w Mobile Workstation
  • OS Windows 8.1 Pro x64
  • Transcend JetFlash USB 3.0 64GB Flash Drive (not UASP)
  • StarTech adapter cable USB 3.0 to 2.5" SATA  w/UASP  (mod. USB3S2SAT3CB) with HGST 1 TB internal 2,5" SATA drive
After turning ON the USB write protection with the Windows registry, I plugged in the two USB 3.0 devices directly into my laptop.

The tool USB Device Viewer shows that the flash drive has been recognized as a "USB Mass Storage device", while the other one as a "USB Attached SCSI mass storage device".

Figure 2: output of USB Device Viewer

In Windows PowerShell, I used the cmdlet GET-WMIOBJECT to list my drives:

PS > GET-WMIOBJECT win32_diskdrive

The thumb drive is shown as a "USB device", on the other hand the SATA drive (externally connected via USB) is shown as a "SCSI disk device". My notebook has USB 3.0 and USB 2.0 ports, but it doesn't make a difference where I plug in the drive. The adapter makes the SATA drive appear as a SCSI device.
Figure 3: Powershell "GET-WMIOBJECT win32_diskdrive" on Win 8.1 Pro

I then checked the read-only state of the two devices by using Diskpart.

The thumb drive (Disk 3 - \\.\PhysicalDrive3) is in read-only mode as expected.

Figure 4: the thumb drive is in read-only mode

The external SATA drive (Disk 2 - \\.\.PhysicalDrive2) is NOT in read only mode.

Figure 5: the external SATA drive is still in WRITE mode
I successfully created a new folder named "BrandNewFolder".

Figure 6: folder creation

 And I created a new txt file named "BrandNewFile.txt" inside this folder.

Figure 7: file creation

I then unplugged the drive and I plugged it in on a second computer (Intel NUC DN2820FYKH with Windows 8.1). The newly created folder was still there. Unfortunately that means I modified my "evidence" drive.

Figure 8: the folder was really written to the drive

I repeated the same test on the second computer and I had the same results.

I made a last test: I went back to my laptop and installed Windows 7 Pro (on a different internal drive). Windows 7 has no native support for UASP. I repeated all the steps written above and this time the 1 TB drive with the mentioned adapter was recognized as a simple USB device in read only mode.

Figure 9: external drive in read-only mode on Windows 7 Pro


Conclusion

The registry key doesn't work on Win8/8.1 with UASP devices. At the moment I haven't found a way to disable UASP. I googled a bit and have found out there are already around some thumb drives which use UASP.

For the time being, stay safe on Windows 7 or choose a hardware write-blocker.