Showing posts with label Apple. Show all posts

Thursday, September 27, 2018

Converting from .heic to .jpg

A file with a .heic extension is an image using the new High Efficiency Image File Format (HEIF).

If somehow you've never heard about it, here are some sample files:
https://trac.ffmpeg.org/ticket/6521

At the time of this writing, not all forensic tools fully support it. For instance, among the tools I have:

  • X-Ways Forensics (v19.7 SR-2) does no picture preview or metadata extraction. It has by the way a file carving algorithm for .heic images since version 19.5 Preview 2;
  • Magnet AXIOM (v2.5.1.11408) is able to preview the images but it doesn't extract (for now) any EXIF data from the HEIF format;
  • Cellebrite Physical Analyzer (v7.9.0.223) stands out from the crowd. If you have a set of images, you can easily view them and parse their metadata by simply choosing: File | Open (advanced) | Blank project | Folder | select the folder containing the pictures to analyze | Finish | Start decoding

Depending on the situation, it could be useful to use external viewers like XnView / CopyTrans HEIC or to convert .heic images to .jpg to make them "compatible" with other tools.

What follows is my method to do the conversion and can be used within a script.

Download and install ImageMagick (free - tested version on Win10: v7.0.8-12 7.0.8-28-Q16-x64-dll). Then open the command prompt and type:

magick SrcFile.heic DstFile.jpg

This will create a JPEG version of the HEIC file, but for some reason the EXIF metadata of the newly created file will be ignored and not parsed by many tools. After some trial and error, I managed to fix this issue with ExifTool (v11.10):

exiftool -overwrite_original -all= -TagsFromFile SrcFile.heic DstFile.jpg

The meaning of each option is the following:

-overwrite_original Overwrite the destination file without creating any backup copy of the destination file
-all= Strip off all metadata from the destination file
-TagsFromFile Copy all metadata tags from the SourceFile into the DestinationFile
SrcFile.heic Source file
DstFile.jpg Destination file

If you need to set the filesystem timestamps "last modified date" and "creation date" equal to the ones of the source .heic file, run ExifTool with these options:

exiftool -overwrite_original -TagsFromFile SrcFile.heic -FileModifyDate -FileCreateDate DstFile.jpg

For more details, you may check the ExifTool Documentation.

Additional resources on the HEIF format:

[UPDATE February 20, 2019]: Thanks to Phill Moore for letting me know that the metadata step described in the article is no longer needed when using the latest version of ImageMagick. Metadata is now properly added to the converted files.

Tuesday, June 20, 2017

Virtualization of a raw image of an Apple OS X system

Years ago Jimmy Weg wrote an awesome blog post on how to create a VMware virtual machine from a raw image file. This is my follow-up on how to virtualize Apple Mac OS X.

Bear in mind that, according to this article in the VMware Knowledge Base: The End User License Agreement (EULA) for Apple Mac OS X legally and explicitly binds the installation and running of the operating system to Apple-labeled computers only.

Having said that, these are the steps to follow.

Prerequisites
  1. WinVMDKCreator (the tool was developed by Dana McNeil and was originally available on Jimmy Weg's blog) 
  2. VMware Workstation (this guide was tested against version 12 Pro)
  3. Patch Tool for VMware (see Install Patch Tool for VMware in the article available here). The two pictures below show the difference before and after installing the patch.
(before)
(after)

Virtualization

#Step 1
Open the raw image with your favorite tool. The following picture shows a Mac mini A1347 I imaged during an investigation. Strangely no encryption was set on that Mac. I haven't tried yet with an encrypted image. I guess you can skip to #Step 3 in that case.


#Step 2
Check which OS X version was installed by looking at the .plist SystemVersion.plist.


In my case the Mac mini was running Mac OS X 10.12 (macOS Sierra).


#Step 3
Launch the WinVMDKCreator tool. Select the image to virtualize under File Data. Tick Set disk image segment file attributes to Read Only. Then press Generate to create the .vmdk file.


#Step 4
Edit with a text editor the .vmdk file just created. Change the value of ddb.virtualHWVersion according to the version used of VMware Workstation.

For instance, if you're using VMware Workstation 12: ddb.virtualHWVersion = "12"

#Step 5
Launch VMware Workstation. From File choose New virtual machine (custom) and set these settings:

Hardware compatiblity Workstation 12.x
Guest Operating System Installation I will install the operating system later
Select a Guest Operating System Apple Mac OS X
Virtual machine name/Location whatever you prefer
Firmware Type EFI (default setting)
Processor Configuration (default settings)
Memory for the Virtual Machine increase to 4096 MB
Network Type Do not use a network connection
SCSI Controller LSI Logic (default setting)
Virtual disk type SATA (default setting)
Select a Disk Use an existing virtual disk
Existing Disk File Click Browse and Open the .vmdk file we previously created with WinVMDKCreator

Click Finish and close VMware Workstation.

#Step 6
Use a text editor to modify the <VirtualMachineName>.vmx file stored in the VM folder.

Append this line at the end of the file:

smc.version = "0"

Without the line above, the VM won't start and will show an error message saying "unrecoverable error: (vcpu-0)".

#Step 7
  • Launch VMware Workstation
  • Take a snapshot of the VM
#Step 8
Now you're ready to fire up the VM!


References

Monday, February 8, 2016

Apple Time Capsule: imaging and data extraction


Imaging a Time Capsule
  1. Tear down the Time Capsule (iFixit provides a detailed guide)
  2. Clone the Time Capsule hard disk to another hard disk (drive-to-drive copy). I used a hardware duplicator for this step. You'll need the cloned drive later.

Data preview

In my case the sparsebundle files were stored in "/volumes/Backup/ShareRoot". FTK Imager will just show a number of files of 8 MB in size.


Data extraction

Prerequisites

Steps to follow
  • Connect the cloned drive in RW mode to your Mac and choose not to use it as a Time Machine drive.
  • Connect to your Mac an additional drive of the same capacity as the Time Capsule drive. In case your Mac doesn't have enough USB/FW ports, you can copy (drag and drop) the sparsebundle files to the internal drive on your Mac.


  • Mount a sparsebundle file in RO mode by typing in the terminal:

         hdiutil attach -readonly yourfilename.sparsebundle

  • List now all connected drives:

         diskutil list

  • Clone the mounted sparsebundle to your destination drive (you must be root for this):

         dcfldd if=/dev/diskMountedSparseBundle of=/dev/diskDestinationDrive conv=noerror,sync


Once finished with dcfldd, unplug the destination drive. As a final step, capture a compressed forensic image of the destination drive. A compressed E01 image will be more or less the same size as the relative sparsebundle file.

You have to repeat all the steps for each sparsebundle file.

If you know a quicker way, please let me know.


Wednesday, October 28, 2015

Apple iOS: Recently Deleted images

Apple iOS 8 introduced a new feature called Recently Deleted album that temporarily displays images that have been removed by the user from the Photos app.


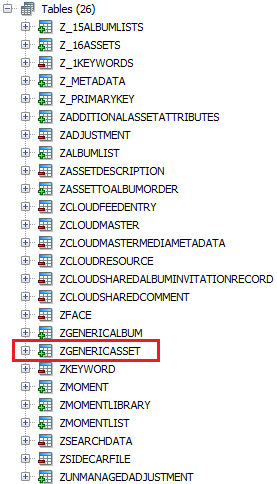
From a forensics perspective, once deleted these images still reside in their original path but they are marked as trashed within a SQLite database called Photos.sqlite.

ZGENERICASSET is the table containing this information.

Deleted images have the ZTRASHEDSTATE field set to "1". We can use the following query to extract and convert what we need:

SELECT ZHEIGHT,ZWIDTH,ZADDEDDATE,strftime('%Y-%m-%d %H:%M', datetime(ZADDEDDATE+978307200, 'unixepoch', 'localtime')) AS ZADDEDDATE_LT,ZDATECREATED,strftime('%Y-%m-%d %H:%M', datetime(ZDATECREATED+978307200, 'unixepoch', 'localtime')) AS ZDATECREATED_LT,ZTRASHEDDATE,strftime('%Y-%m-%d %H:%M', datetime(ZTRASHEDDATE+978307200, 'unixepoch', 'localtime')) AS ZTRASHEDDATE_LT,ZTRASHEDSTATE,ZDIRECTORY,ZFILENAME FROM ZGENERICASSET WHERE ZTRASHEDSTATE=1 ORDER BY ZTRASHEDDATE

Here's the result:


[UPDATE 02/10/2017]: This post has been cited as a source in the "Application data analysis" section of Learning iOS Forensics, 2nd ed. (p.286).