It was about the analysis of a Nokia Lumia 800 mobile device. This is the tweet related to it:
My post on #WindowsPhone 7.8, #forensic analysis with python scripts: http://t.co/r3bCqZRKOE #DFIR #forensics #mobileforensics— Gabriele Zambelli (@gazambelli) September 5, 2015
On July 29th 2017, I found out about an article that had been published a few days before. The article is titled Windows Phone Forensics and was written by a guy named Hashim Shaikh at Infosec Institute. Unfortunately his article contains an unauthorized reproduction of my article and I wasn't even given credit for the research.
 |
| (https://i.imgur.com/SxcIZHH.png) |
I immediately tried to leave a comment by going through Disqus. My comment has never been approved and is still pending.

I then tried to make Infosec Institute aware of it with a tweet. Till now there's been no answer from them.
https://t.co/qhy50jwwAH contains an unauthorized reproduction of my article: https://t.co/8NlQ7yauQE. Please remove it. #DFIR @infosecedu— Gabriele Zambelli (@gazambelli) July 29, 2017
"Please remove it" seems to me a straightforward, simple and clear request. Apparently it's not.
Since there was no reaction at all from Infosec Institute, I posted another tweet. I'm very grateful to all the people who have decided to read, comment and retweet my message. What has happened to me could have happened and could happen to anybody else.
The #DFIR field doesn't need people who take credit for others' work. My comment at https://t.co/qhy50jwwAH is still pending. @infosecedu pic.twitter.com/5wDHAnZDpm— Gabriele Zambelli (@gazambelli) July 29, 2017
Actually it seems that Infosec Institute is not new in plagiarizing other people's work according to Attrition.org.
On August 4th 2017 in the morning (Italian time) I posted a similar message on Linkedin in which I mentioned both Infosec Institute and Hashim Shaikhthen. After a short while I received an invitation from the guy.

I decided not to accept his invitation and made him aware of that by posting a public comment. In my opinion a public issue has to be solved publicly. There's no room for private messages. Not after all this silence.
I soon received a surreal comment from him that he deleted later. Deleting evidence is never a smart move.
Luckily I took a screenshot. It's so funny if you think about it: I'm fighting copy&paste with another copy&paste! Here below you can read his reply.

Wtf?! As you may imagine, this was my reaction:

Treating honest researchers as morons doesn't sound a clever move to me. Moreover, deleting a public message where you admit the truth and still deny part of it appears to be an even worse behavior. At Infosec Institute, have you ever heard the words "apology" and "ethics"?
As a general reminder: research is the desire to understand, learn and share. It takes a lot of effort in terms of time and money. Just because this is a freely available blog doesn't mean you can grab content and take credit for someone else's work. If you can't live ethically, I'm afraid there's no place for you in the DFIR field.
Replying to his nonsense message was pointless. What I'm about to write here is a better reply.
From this part of the article I'll provide a lot of evidence to show and regain the authorship of my work. I'll stick to facts as I always do in my day-to-day job as a forensic analyst.
We all know from school that changing the order of the addends does not change the sum. That means that simply changing the words in a sentence doesn't turn a plagiarized article into an original work. It still remains a plagiarized piece of junk.
For next time (I really hope there won't be one) I recommend the guy to use an easier tool for checking. Let me describe it: it's free, it's a search engine and doesn't forget a single detail. People call it "Google". I'm sure the guy already knows it. Apparently "Google" is the only thing he changed while copying & pasting. Do you see that unique timestamp in both articles? What a coincidence!

I also have some Google searches for other very unique keywords extracted from my research article. All these searches produce only two hits. And guess what: all the oldest hits are always related to my article ;)

If you want to double check for yourlself, these are the syntaxes for the searches:
- Search 1: “LastVisited”=hex:10,2F,A0,FF,FD,D7,D0,01
- Search 2: "\Applications\Data\BC4F319A-9A9A-DF11-A490-00237DE2DB9E\Data\Isolatedstore\ARFileOpenParms.xml"
- Search 3: intext:{Twitter UserID}.Timeline.dat
- Search 4: "\Data\IsolatedStore\btsharing.sdf"
At this point I think I deserve a public apology. Dear Infosec Institute, I'll repeat it one more time: remove the unauthorized reproduction of my article from your website.
As an analyst I rely a lot on my human brain and skills. True professionals, no matter what the field, never rely on a single tool.
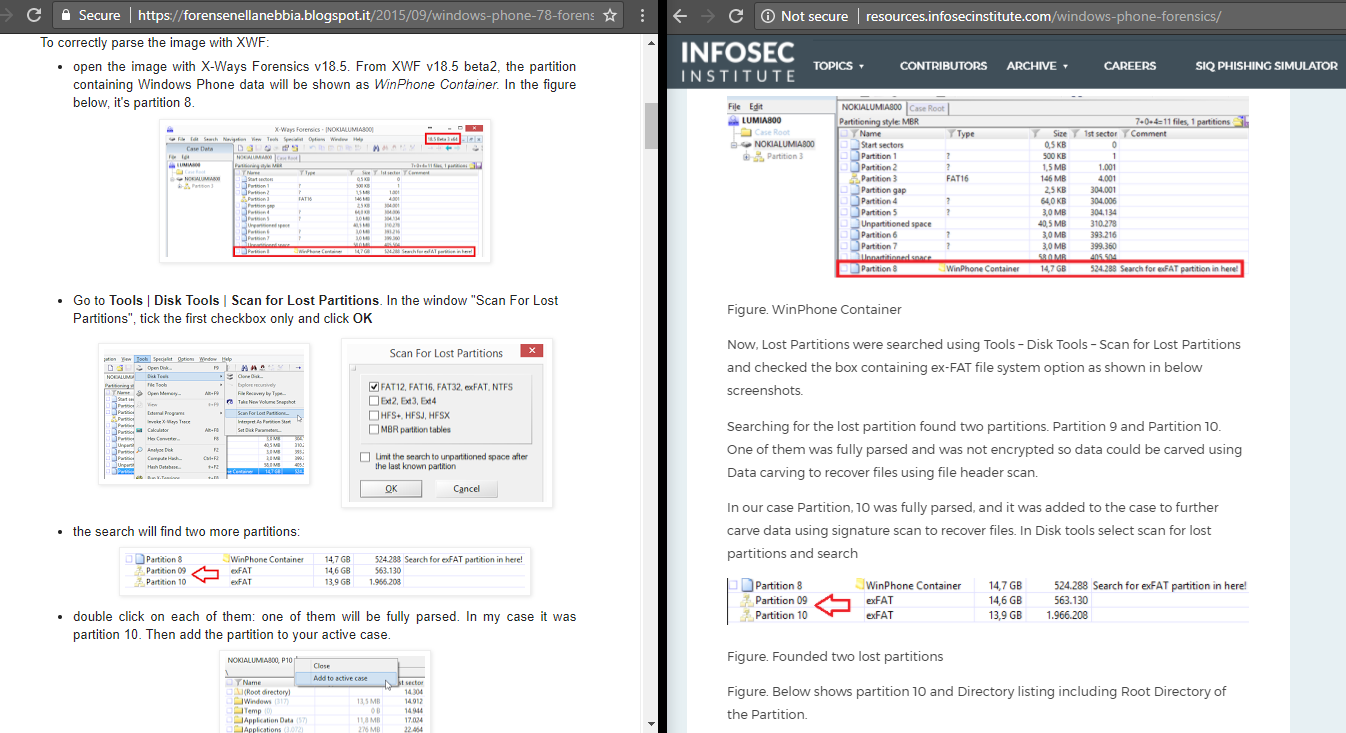
I'll now let pictures speak for themselves. What follows is a comparison of the two articles: mine (on the left) and Infosec Institute's unauthorized copy (on the right - at the time of writing this blog post).


Probably somebody should think twice before writing something that is far from being the truth.
 |
| (https://imgflip.com/i/udhs9) |
Here are some more comparisons:


Authors are damaged twice by plagiarism: 1) by plagiarists who take credit for somebody else's work; 2) by all the people who share in good faith plagiarized articles.
We live in an age where we are daily overwhelmed by a lot of information and none of us has the time to double-check if an article is original or not. That doesn't mean that companies or people can take advantage of that for whatever reason.
Good reputation is something that is won over the years with sweat and tears, but at the same time it's something that can be lost in a blink of an eye.
 |
| (http://www.graphicsdb.com/img78380.htm) |
- - - - - - - - - - - - - - - - - - - - - - - - - - - - - - - - - - - -
InfoSec Institute took down my work from their website! Hopefully forever.
I'd like to thank those who have supported me by joining the protest that started on Twitter when I shared this blog post.
I've never been so happy for a "Page not found" message! @InfosecEdu took down my work. Thanks everybody for making all this possible😎 #DFIR pic.twitter.com/NOfbdgpLlJ— Gabriele Zambelli (@gazambelli) August 9, 2017


